Field Dressing and Butchering a Deer

Field dressing is one of the most crucial skills a hunter can use in regards to deer hunting. Quickness after the kill is also imperative as it prevents the meat from becoming spoiled. To avoid having to spend large sums of money, the following skills will also come in handy when you want to butcher and process the meat on your own.
Field Dressing
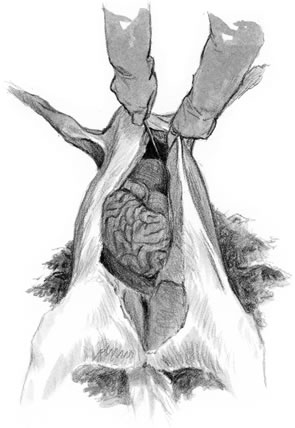
Once the dead deer has been located, you’ll want to turn it on its back with its legs pointed in the air. Begin by spreading the back legs slightly and cut just below the deer’s tail. Without plunging the knife fully inward, you want to place the tip directly underneath the hide. However, make sure to avoid slitting the intestines – you’ll have a real mess on your hands if you perforate the gut. Use an upward motion with the blade and cut toward the head of the deer and up to the rib cage. Once you see the thin membrane, gently cut it away so the intestines are then exposed.
When finished, the deer should be rolled to its side. Place your hand inside the deer and remove the intestines onto the ground. To avoid having urine ruin and taint the deer meat, you’ll want to ensure that the bladder of the deer does not puncture or break. The stomach should still be attached and lie inside the cavity of the deer’s chest. Try not to puncture this. Locate the diaphragm and gently cut it loose, making sure it separates all around the cavity.
Using your free hand, try to capture the food canal that leads into the stomach. Move forward with the knife and remove the food canal. When finished, place to the side. You’re now ready to move to the rear of the deer toward the pelvis, so you can cut away the colon. Until the pelvic area is cut wide open, you won’t be able to remove the colon in its entirety. To free up your work site, you’ll want to put aside both the intestines and stomach.
The deer is ready to be placed on the back once again in order to pull out the liver, heart, and lungs inside the chest cavity. Unless you want to use the items, you can discard the organs.
The pelvic arch is easy to see now that the intestines have been removed. Look for the pelvic arch below the deer’s tail. With your game saw, make a cut down and through the pelvic arch. This allows the deer’s back legs to completely spread out. It also exposes the colon. In order to remove the colon and any remaining feces, reach inward, pull up, cut and discard.
Place the deer on its stomach and spread its back legs. This will help the blood to run out and allow you to transport the deer home. When you’ve arrived home, the deer should be placed in a shed or garage and hung by the back legs. Place a slit through the hide of the large tendon and leg bones of the back legs. Insert rope into the cuts and lift the deer, making sure that its head is downward.
With your game saw, place an incision down the deer’s rib cage and into the throat. This allows you to better reach and remove its windpipe. In order to open the cavity, you can place a piece of lumber inside. To give the deer proper time to cool, it should be hung for at least 24 hours. Be sure to avoid sunlight and other methods of direct heat during this time.
Butchering
Once the deer has cooled for the required 24 hours, it’s time to butcher it. Take your hunting knife and cut downward inside the hind legs of the deer and around the hocks. Cut between the hide, and the meat to help free it completely. This should be done until you’ve reached the deer’s back. Similar to peeling and removing a sock, cut the tail and pull the hide slowly downward. If you encounter any difficulties, cut it similar to what you did around the legs. Repeat the same process with the front legs by making incisions on the inner parts of the limbs. The front legs can be cut off at the knee joints. This allows you to continue to skin and makes pulling down the hide easier. You can then remove the remainder of the hide and cut the deer’s head off. The deer will need to be hung for another 48 hours. However, the carcass should be covered with a mesh bag. This process allows the meat to season and cool.
When you’re ready to butcher, you’ll want to use your hunting knife. Begin at the front of the legs and remove them. This can be done by holding the tissue of the shoulder. Repeat this on the opposite site. In the back of the deer, cut away larger portions of meat along the deer’s spine. Using your knife, cut downward to the vertebrate and rib bones — until the meat has been freed. Repeat the steps on the other side.
Cutting the leg off at its hock joint, you’ll now be able to cut its hind quarters. However, you have to go around the muscles and sockets. When you’ve mastered this maneuver with both sides, you’ll want to bring the meat to the table.
A sharp butcher’s knife will help you prepare the meat, so you can cut them into steaks. Begin at the top of its muscle and move to the smaller end. You can make smaller round steaks out of the back straps. Use the front portions for roasts. With the remaining meat, use any extras to make jerky or grind for sausage and hamburgers. Before you wrap the items in paper or plastic, you’ll want to wash the meat first. When done, store for later use in the freezer.
