
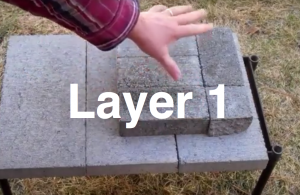
 Layer 1
Use three whole bricks and one half-brick, chopped in half with expert precision using your heavy-duty trowel (or not so cleanly broken with your hammer, or hatchet) to make the foundation layer for your rocket stove.
—
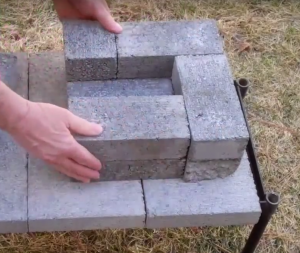 Layer 2
Overlapping as many joints as possible, arrange 3 full bricks and the second half of your broken brick in the configuration shown in the photo to the right.
NOTE: This layer does leave a gap from which the stove will draw air into the fire chamber.
—
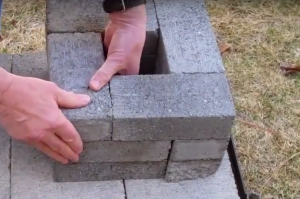 Layer 3
Next, use 4 large bricks to complete a square pattern, fully enclosing the “chimney” portion of this design.
Again, do your best to cover any joints in the previous layer to increase the stability of the stove.
—
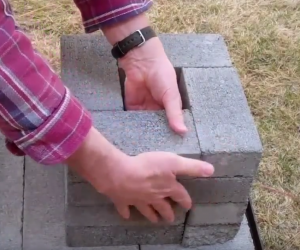
Layer 4
For the fourth and final layer, you’ll simply repeat what you did in Layer 3, taking care to overlap the Layer 3 joints as you stack your bricks.
Lastly, place you 16th brick in front of the mouth of your stove, making it easier to feed and preventing any small fires from starting in front of your stove.
Very good idea ,so simple anyone can do it . good presentation thanks for the information .im going out in the yard and gather my bricks to put my own together and give it a try . thanks
Really a good idea and very simple. One thought – better use “fire” bricks, as regular bricks may contain some water and explode when heated. This is also true of stone. Do not use lime stone or and stone to build a fire place or oven as they are also porous and can retain water.
Oh please! This is HIGHLY OFFENSIVE TO WE BRITISH! The reason being that we have been building & using the whole rocket stove concept BEFORE the term was thought of! I was trained to construct the same thing with substantial improvements which we developed since the Boer War! Back then & even today, we Limeys refer to this as a flatbed cooker. We use handy angle shelves to make the main heating bed onto which we place our cooking vessels, pots, pans and kettles.
I can even train folks to learn HOW to use more than one type of fuel to fire it up. Not solid fuel either, diesel and engine sump oil, along with water – yes – you are reading this correctly! Water with oil being used in a fire! Crazy, but then we Brits are well known to you Americans for being nuts, yet coming up with sheer genius out of it all.
The only real feedback to give, at this stage, Is USE CLAY BRICKS! Silicate bricks, ash or cinder blocks, compressed concrete paving blocks ARE dangerous to use in such. WHY? It is down to the way that they are manufactured. They all require water in their production, molding & compression. Sometime this water can be held in tiny pockets as liquid. As the block starts to heat up, so does the water inside the pocket. SO when it reaches 100 degree Celsius, it can explode with violence! To explain this in clearer terms, 1 cubic inch of water at 100 degrees C under pressure, with become 1 cubic foot of steam in less than 1 second in the open air. This is enough to explode or crack such materials being exposed to such heat.
I hope that my comment has been of some use to folks, Stateside?
Respectfully Yours,
JGH Boyes.
Thanks for the demo I would have never considered such a thing and I will add it to the list of knowledge obtained by research.
Again much appreciated.
JN USA
Well JGH Boyes,
despite your rant, if we can get past cultural differences, LOL, I would like to hear how you do it differently. Maybe you could offer a tutorial here and/or on YouTube.
It’s true that clay or firebricks such as used in forging metal would be better, but sometimes people are just exploring alternative ways to survive. Of course as you point out, an explosion in a crisis isn’t going to help and in fact poses a risk that may be detrimental when medical help isn’t coming. It does concern me that even at the temperature to boil water that the bricks can explode which means that cooking meat would require 3x hotter fire increasing the potential for a blow up.
I have also seen people fill a bucket with cement and create the funnel or airway for the fire and it’s heat with metal cans or PVC, which is later removed. This seems safer, but of course the cement is mixed with water. I don’t know if this is safer or the same hazard exists.
Thanks for the video and knowledge. I like this idea a lot better than some of those on the market made of medal. Like you say, this stove is sturdy, I won’t have to be concerned with the stove and ultimately the pots tilting over. I really like your stove.
Well I think you should show us another way that may be safer so how about it?
Is there any way I can learn to build your “version” of the rocket stove? Your method sounds much, much better and also much safer. Thank you very much!
If you have the ability, and you may not in a survival situation, by all means select the best materials for the job, i.e. red clay bricks or heat resistant cinder blocks. Just to play devil’s advocate here, all this about bricks “exploding” has been a bit over-hyped thanks to the internet. Given moist conditions and rapid temperature changes, some bricks can “fail.” These bricks may crack, pop, shatter, and eventually crumble… but explode? Not likely. Fail is probably a better word.
Can use a Dakota fire pit in the same way and all that requires is a hole in the ground. Could also build your stove from mud. Initial fires would dry the mud into a rigid structure. Clay soils are better for this method.
Very good idea. I have to try this. Thanks.